- Basic Operations
- Edit Shape
- Internal Structure
- Useful Features
1. Basic Operations
When you start Pop-Up Card Designer, a card opened at a right angle appears. You can change the view by dragging with the right mouse button. You can zoom in and out with the mouse wheel. Hold down the [Ctrl] key and right-drag the mouse (or mouse wheel drag) to translate the viewpoint.
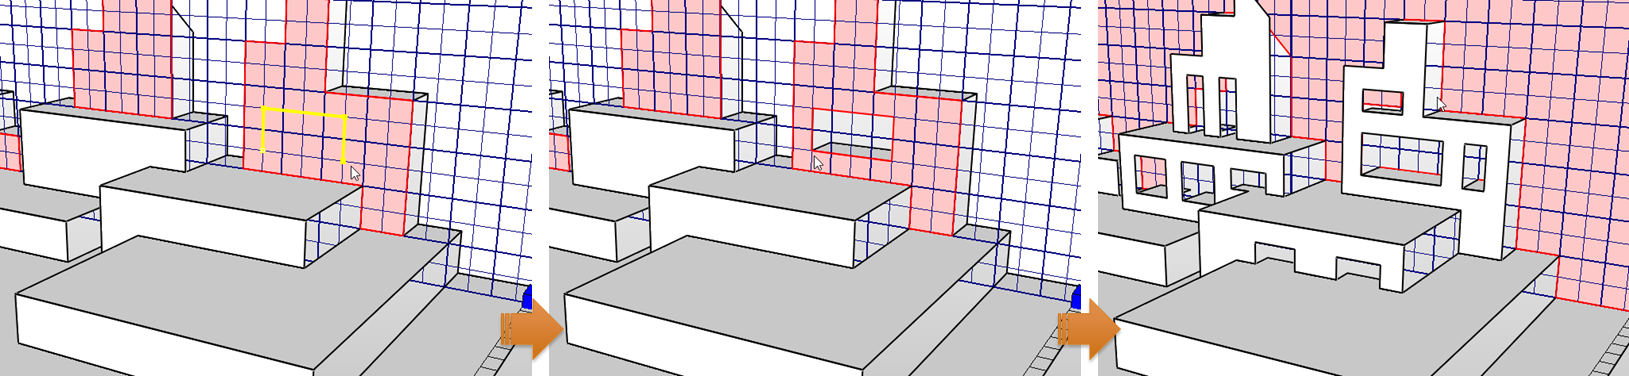
You can create a polygon by left-clicking on the grid of Edit Plane.
Click the same spot again, or click on the first point to close the polygon.
Press the space key to switch the grid from vertical to horizontal.
Pressing the space key again changes it from horizontal to vertical (corresponding toolbar button is ![]() ).
).
You can change the position of the grid by dragging the cube located at the corner of the grid or by pressing Up/Down cursor buttons.
In the menu, select [View] - [Open/Close Animation] ![]() to display an animation of the card opening and closing.
You can check the template of the pop-up card in the print preview.
to display an animation of the card opening and closing.
You can check the template of the pop-up card in the print preview.
You can hide the Edit Plane using the [Edit Plane] - [Hide Edit Plane] menu or by pressing [Ctrl] + H.
2. Edit Shape
2.1. Move Vertex Points
Select [Edit]-[Edit Mode]-[Move Vertex] menu ![]() to move the vertices that make up the polygon's outline.
You can move the vertices of a polygon on a grid.
If two vertices are superimposed at the same position, they are merged into one.
Holding down the [Ctrl] key while dragging a vertex will split that vertex into two.
to move the vertices that make up the polygon's outline.
You can move the vertices of a polygon on a grid.
If two vertices are superimposed at the same position, they are merged into one.
Holding down the [Ctrl] key while dragging a vertex will split that vertex into two.
2.1. Make Openings
You can switch the editing mode through the [Edit] - [Edit Mode] menu.
When the editing mode is set to [Opening]![]() , the polygons you enter on the grid become openings (The outline of the polygon for Opening is displayed in yellow.).
, the polygons you enter on the grid become openings (The outline of the polygon for Opening is displayed in yellow.).
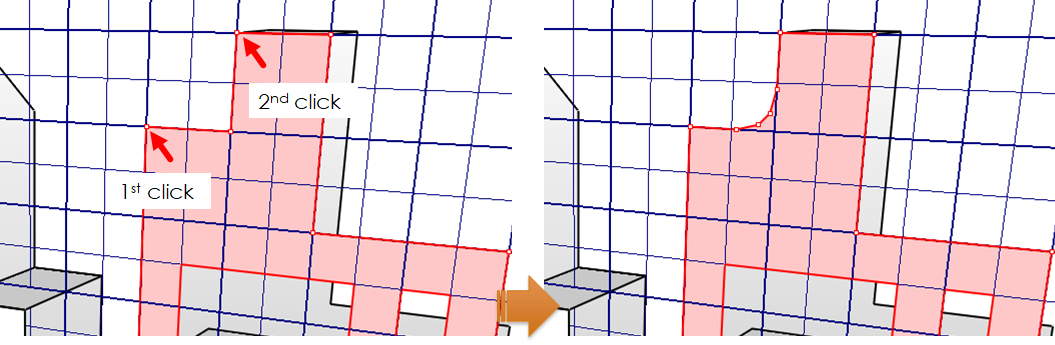
2.2. Make Curves
Pop-Up Card Designer cannot handle curves directly, so it approximates them with a fine polyline.
After changing the edit mode to [Subdivide Between 2 Points]![]() , selecting two vertices of an already entered polygon will smooth the shape of the contour between the two vertices (following the contour clockwise).Repeat this operation and the contour will be smoothed with finer polyline.
, selecting two vertices of an already entered polygon will smooth the shape of the contour between the two vertices (following the contour clockwise).Repeat this operation and the contour will be smoothed with finer polyline.
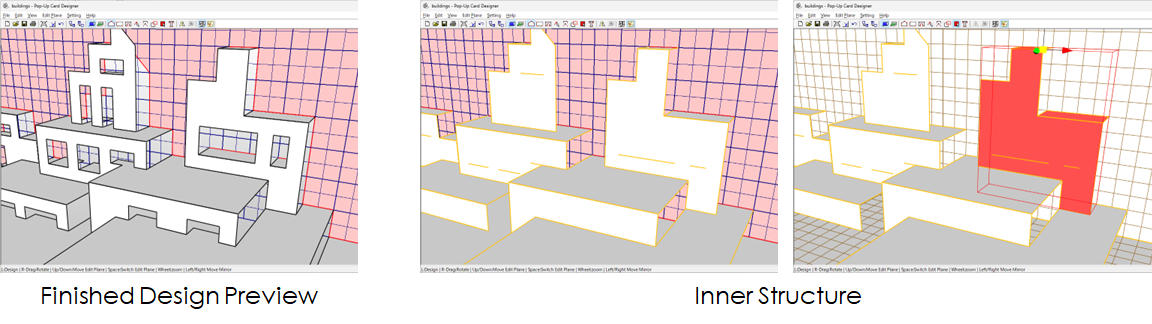
3. Internal Structure
Pop-Up Card Designer retains the polygons as you entered.
What you see on the screen is a Finished Design Preview of the polygons after they have been adjusted so that they can be created on a single sheet of paper.
To see the polygons you entered, select [View]-[Display Mode] and choose [Inner structure]![]() .
In this state, you can move the polygons and adjust their shapes.
.
In this state, you can move the polygons and adjust their shapes.
One important and difficult to understand is that the polygons have priorities. When multiple polygons are in conflict with each other on the template, the polygon with the lowest priority will be partially cut off by the polygons with the higher priority. The later polygons are entered, the higher the priority. This priority can be changed through [Edit]-[Change Order of Selected Polygons]
4. Useful Features
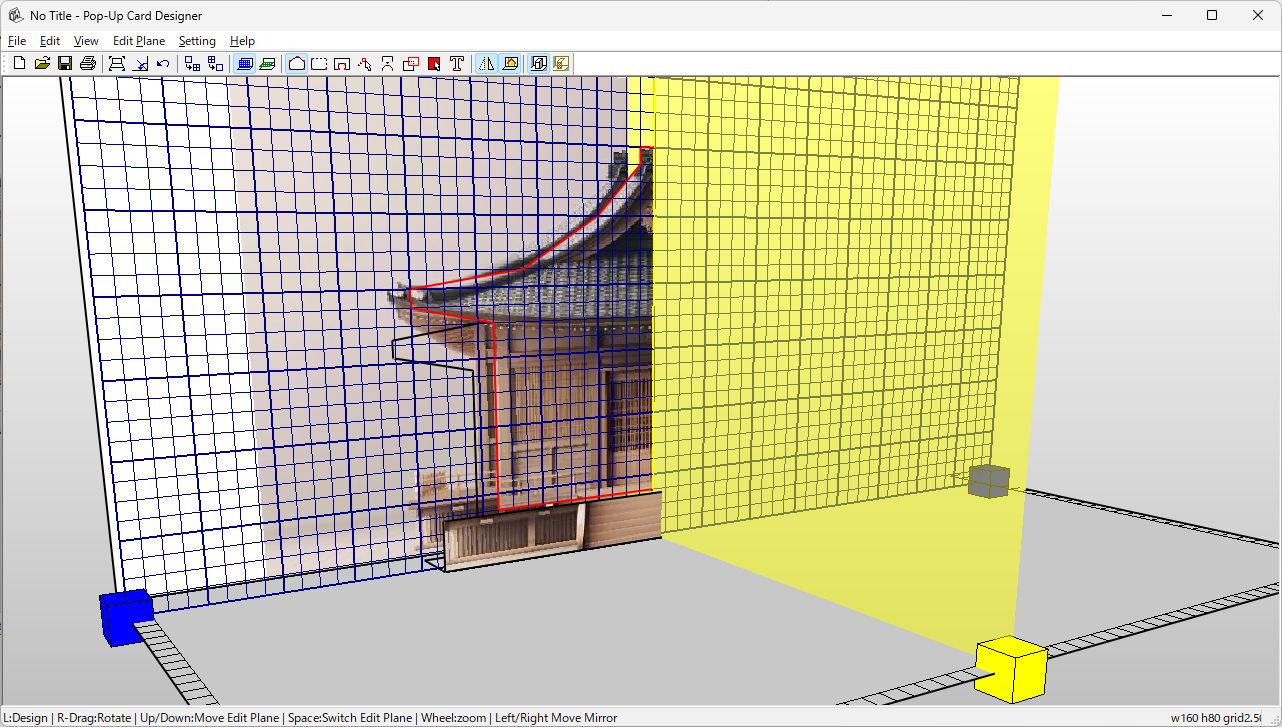
4.1. Reference Image
When drawing a polygon, it is useful to be able to trace a photo or other image. A reference image can be placed on the backface by selecting [Setting]-[Reference Image].

With the reference image in place, you can draw a polygon.
When [Edit]-[Mirror Mode]![]() is turned on, a yellow plane appears in the center, making it easy to enter a symmetrical shape.
is turned on, a yellow plane appears in the center, making it easy to enter a symmetrical shape.
4.2. Input Text Shape
You can use the [Edit]-[Input Text Shape]![]() menu to input text shapes.
To make it actually pops up, you need to add polygons so that no parts are floating in the air.
menu to input text shapes.
To make it actually pops up, you need to add polygons so that no parts are floating in the air.
